
Table of Contents
ToggleHow To Draw Santa Claus | Christmas Draw & Color Tutorial
For artists of all ages, drawing Santa Claus is a cherished holiday custom. Learning to draw Santa can be enjoyable and fulfilling, whether you’re making your own Christmas cards, decorating your house, or just looking for a festive pastime.
Everything you need to know about Santa Claus drawing will be covered in this thorough guide, from basic methods for novices to advice on how to make your Santa genuinely unique.
Why Santa Claus Drawing Is Perfect for the Holiday Season
Santa Claus drawing is a way to commemorate the magic of Christmas, not just a creative endeavor. You can create original greeting cards, personalize holiday decorations, and spend time with your family by making your own Santa artwork. Additionally, sketching Santa embraces the festive spirit while fostering artistic abilities.
What You'll Need for Your Santa Claus Drawing
Before we begin, gather these basic materials:
- Pencil (for sketching)
- Eraser
- Paper or sketchbook
- Black pen or marker (for outlining)
- Colored pencils, markers, or crayons (red, white, black, pink/peach)
- Optional: glitter, cotton balls for added texture
Santa Claus Drawing Easy: Step-by-Step Tutorial for Beginners
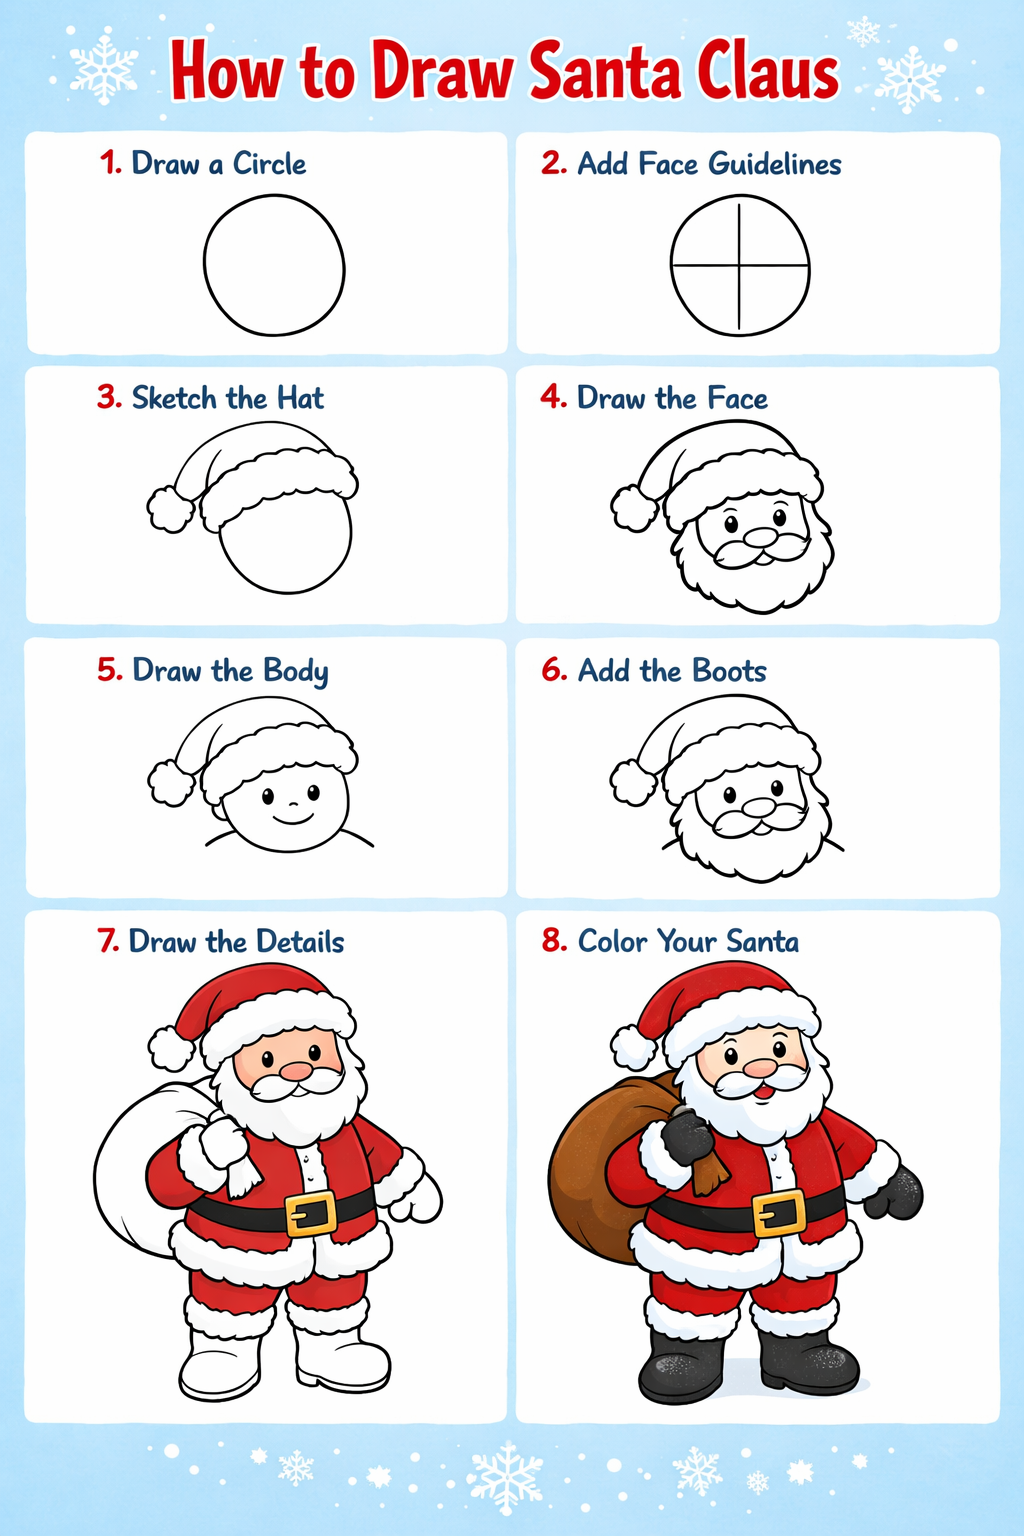
Lets Draw a Santa Claus with below steps:
Step 1: Start with Basic Shapes
Step 2: Add Santa's Iconic Hat
Step 3: Create the Jolly Face
Step 4: Draw the Magnificent Beard
Step 5: Add the Mustache
Step 6: Complete the Body and Suit
Step 7: Final Details
Step 8: Outline and Color
Watch Video
Santa Claus Drawing Easy Variations to Try
Cartoon Santa
For a playful cartoon Santa Claus drawing, exaggerate features like making the eyes larger, the nose rounder, and the body more rounded. Cartoon Santas often have simplified details and bold outlines, making them perfect for children’s projects.
Realistic Santa
If you want a more detailed Santa Claus drawing, focus on shading and texture. Add individual beard hairs, wrinkles around the eyes that show his age and wisdom, and more detailed fabric folds in his suit. Use multiple shades of red and white to create depth.
Chibi or Cute Santa
Create an adorable miniature Santa by drawing a large head with a small body. Make the eyes extra large and sparkly, and keep the proportions child-like. This style is incredibly popular and perfect for stickers or small decorations.
Santa Face Only
Sometimes a simple Santa face drawing is all you need. Focus entirely on the face, hat, and beard, filling your entire page with Santa’s jolly expression. This works beautifully for wrapping paper designs or as the centerpiece of a greeting card.
Tips for Making Your Santa Claus Drawing Stand Out
Use Reference Images: Look at various Santa images to understand different styles and details. This helps you develop your own unique approach to Santa Claus drawing.
Practice the Beard: The beard is often the most challenging part. Practice drawing cloud-like, fluffy shapes separately before adding them to your Santa drawing.
Add Personality: Give your Santa character through expression. A winking eye, a hearty laugh, or a gentle smile can transform your drawing from good to memorable.
Experiment with Poses: Try drawing Santa in different positions—waving, holding a gift, sitting in his sleigh, or checking his list. Movement adds interest to your artwork.
Include Background Elements: Enhance your Santa Claus drawing with snowflakes, presents, Christmas trees, or a cozy fireplace scene.
Common Mistakes to Avoid in Santa Claus Drawing
Many beginners struggle with proportion. Make sure Santa’s head isn’t too large or small compared to his body. The general rule is that Santa should look rotund and jolly, not thin or stretched.
Another common issue is making the beard too small or flat. Santa’s beard should be full, fluffy, and three-dimensional. Don’t be afraid to make it big and flowing.
Avoid making Santa’s face too young. While he’s jolly, Santa has kind eyes with crow’s feet and a weathered appearance that shows his centuries of Christmas deliveries.
Santa Claus Drawing for Kids
Teaching children Santa Claus drawing easy techniques can be a wonderful bonding activity. Start with the most basic shapes—circles for the head and body, triangles for the hat. Let them add their own creative touches with stickers, glitter, or cotton balls glued on for texture.
Encourage kids to draw simple features: two dots for eyes, a circle for the nose, and a curved line for the smile. The beauty of children’s art is in its authenticity, not perfection.
Taking Your Santa Drawing to the Next Level
Once you’ve mastered the basic Santa Claus drawing, challenge yourself with more complex compositions. Draw Santa with his reindeer, emerging from a chimney, or in his workshop surrounded by elves and toys. These scenes tell a story and showcase your growing artistic abilities.
Consider creating a series of Santa drawings showing different expressions or activities throughout Christmas Eve. This could become a cherished holiday decoration or even a handmade storybook.
Digital Santa Claus Drawing
If you prefer digital art, the same principles apply. Use drawing apps or software to create your Santa, taking advantage of layers for easier editing. Digital drawing allows you to experiment with colors and effects without worrying about mistakes, as everything is easily adjustable.
Using Your Santa Claus Drawing
Your finished Santa artwork has countless uses:
- Create personalized Christmas cards for friends and family
- Design custom wrapping paper by repeating your Santa pattern
- Make holiday decorations like banners, ornaments, or window clings
- Share on social media to spread holiday cheer
- Frame as festive home decor
- Use as coloring pages for others to enjoy
Conclusion: Embrace the Magic of Santa Claus Drawing
Learning Santa Claus drawing easy techniques opens up a world of creative possibilities during the holiday season. Whether you’re a complete beginner or an experienced artist, drawing Santa allows you to connect with the joy and wonder of Christmas in a personal, meaningful way.
Remember, there’s no single “right” way to draw Santa. Each artist brings their own style and interpretation to this beloved character. What matters most is capturing the warmth, generosity, and magic that Santa Claus represents.
So grab your pencils, let your creativity flow, and enjoy the process of bringing Santa to life on paper. With practice and patience, you’ll soon be creating Santa Claus drawings that delight everyone who sees them. Happy drawing, and Merry Christmas!
Search Keywords:
Topics:
- How to draw santa claus easy step by step guide for everyone with pencil?
- How to draw santa claus easy step by step guide for everyone youtube?
- How to draw santa claus easy step by step guide for everyone with colour?
- How to draw Santa face?
- How to draw Santa easy with pencil?
- How to draw Santa Claus full body?
- How to Draw Santa realistic Easy?
- How to Draw Santa face easy step by step?